Tuesday, June 19, 2012

Laminated Writing Practice Sheets

Here is a simple one for those of you that want to have a school related activity for the car or at home. 
First, print out a tracing guide that you like. I wanted the arrows that instructed my kiddos HOW to print, and I found bother Uppercase and Lowercase.

Then I used two sided tape to keep them back to back, so they would not slip.

I do not have a heat or cool laminator machine (sniff, sniff), but I did purchase this box of laminated sheets a long time ago on SALE! They are perfect for this project, if of course, you don't have a machine.

You will use 2 sheets. Eyeball the size of your ABCs on a sheet before it is peeled off. It is important to only peel one sheet first. Lie your back to back sheets onto one sticky laminator sheet. Then peel the second one and line up as best you can. There is no such thing as "crooked" on this project because you have room to cut and adjust the laminated border around your ABCs.

Hand your kiddo(s) a dry erase marker and a tissue and tell them to follow the arrows. Depending on the age of your little one, you can work on one letter a day or use the full set as a daily review...especially in the summer.

I also made a horizontal one.

Using laminating sheets or your machine, if you are LUCKY, is useful for so many things. Here's to everyone trying something. Easy, peasy, right?
~hurley

Monday, June 18, 2012

Homemade Felt Ice Pop Holders

My daughter is about to have her 5th Birthday party this weekend, so I have been a bit out of the Blog loop getting ready for it. Fortunately I already did a simple "save the date" for her while school was in session because last night I had to send out an Evite (although it was super cute, with her photo) for her invitation. Actual party stuff is adding up, so I gave up on a paper invite. I hope I am forgiven.

One bonus for a June 22 birthday is that it can be an indoor OR an outdoor party and it usually involves something cold. This year it is:  ICE POPS! Her party theme is simply PINK. PINK. PINK. I am making felt ice pop holders for the dear angels to use while cooling off with their ice pops. Check out how easy it is!
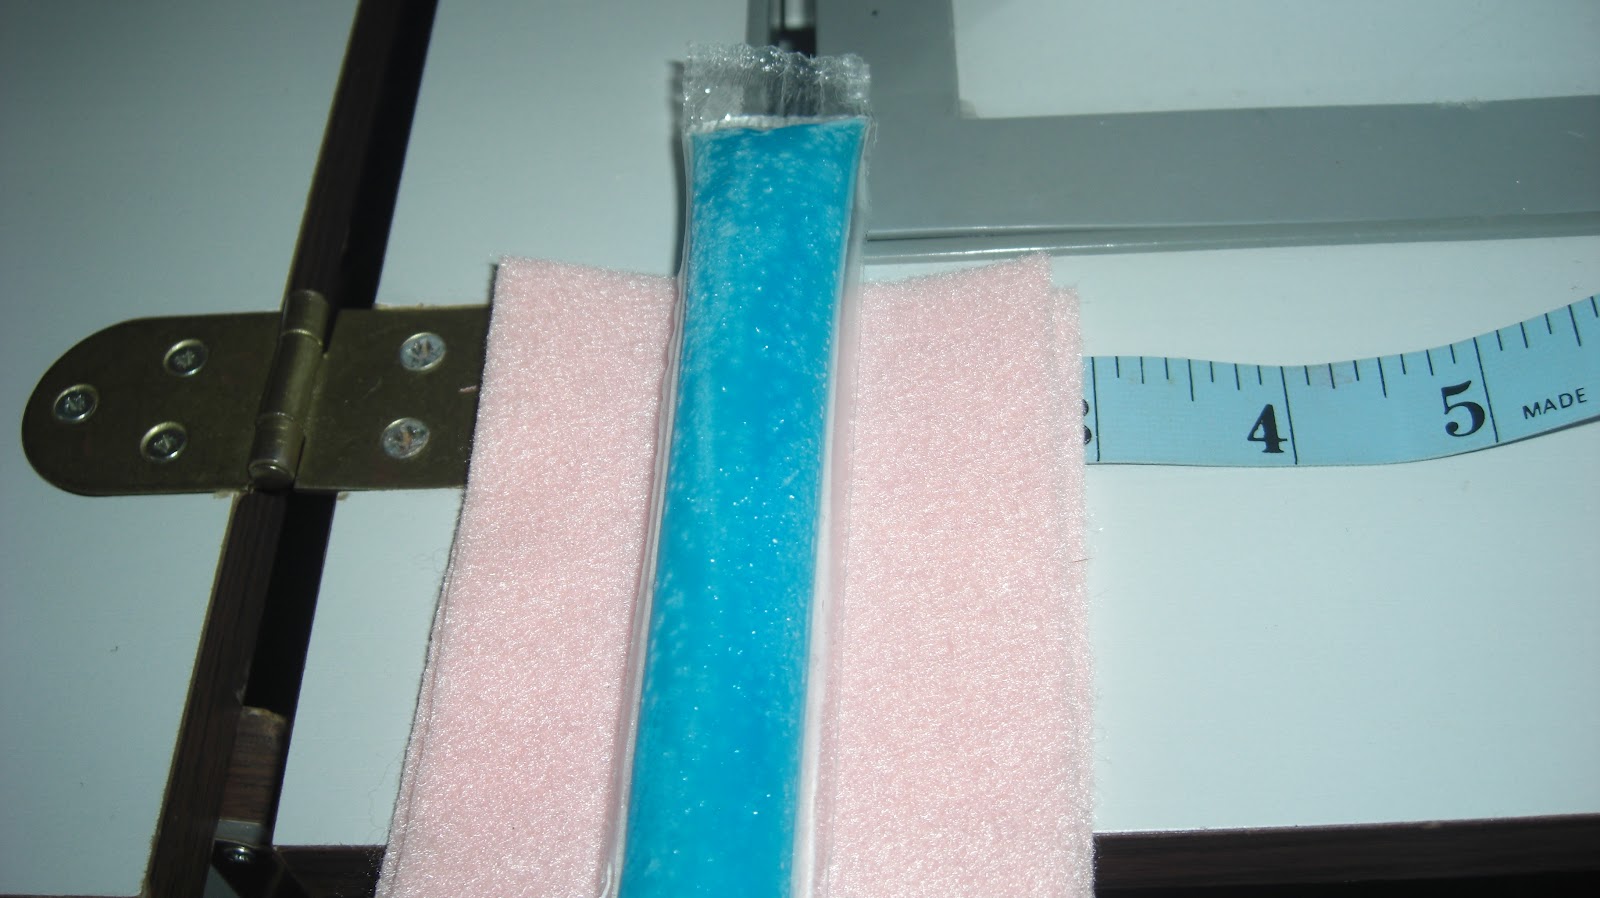
1. First, you need your choice of felt color. The size of this felt sheet is 9" x 12", so I roll it, so I can cut strips of 4 inches wide which results in three 4" x 9".

 2. From those strips, I cut 3 inches wide, so it results in 3" x 4" rectangles. Each felt sheet gives you nine rectangles or 4.5 holders. I use 2 felt sheets to make 9 holders.

3. Here is my carefully stacked set of 18 rectangles. I then match them up in pairs the best way possible because I am not a perfect "cutter." 

4. I use hot pink thread to go with her PINK theme, and I eyeball measure the width for an ice pop to fit. The rectangle width is 3 inches, and the ice pop is a little over an inch, so I determine to use a 1/2" seam.


5. I sew them in a row with a backstitch on each one. The backstitch might be overkill on an ice pop holder, but, oh well. I sew the right side of the rectangle through all the holders. I then flip it around and sew the "left" side.

 6. When I am done sewing I take my shears and cut on both sides just to give it an extra decoration. FYI: Felt is not easy to cut with shears.

7. Of course, I want to triple check that the ice pops fit... You can actually be done with this simple project at this step.

8. I want to monogram them, so I added Heat N Bond to the back of some pink patterned material and cut out an L.

9. When you iron FELT, it is very important to use a cotton cloth to protect your iron from melting the felt all over the iron. (I will not go into details on how I know that.)

10. Tah-Dah! Here is my first monogramed Homemade Ice Pop Holder.

Here is to warm fingers and cool throats during the summer!
Have a great day! Stay tuned for more birthday crafts.
~hurley


Thursday, June 14, 2012

Will Blog for Comments...

I have said in the past that I blog for fun, and not money. I should probably edit that to say that I blog for a very selfish reason: appreciation.
Another blogger agrees... hannah j. holmes
I love to hear that a project worked for someone, or that a post was funny and made someone smile. Fortunately, I do have family and friends that email and say "good job," but I would be lying if I did not get all giddy inside if I saw comments on my blog posts themselves. No you don't have to go crazy and post something on every post (unless you want to), but if something made you smile or prompted you to try something, I'd LOVE to hear about it in my comments. I also would not mind questions. Trust me, I have time to respond to comments.

If you receive my blog via email, which is AWESOME, click on the name of the post in your email and it will bring you to the live blog online. At the bottom of the post is the comment box. I sincerely appreciate any words (well, not ALL types of words). If you want to be emailed, just enter your address in the handy email box at the top.

Speaking of appreciation, I have added the pinterest button to each of my blog posts, so you can easily pin something to your pinterest board. If you are not up to speed on Pinterest, check THIS out.

Now that I unashamedly asked for feedback, I am off to work on my next idea.
Have a fantabulous day!
~hurley


Wednesday, June 13, 2012

My Homemade Catholic Mass Picture Schedule

My kiddos are 6 1/2 and almost 5. Overall, they do really well in mass. One annoyance is the constant question "Is mass almost over?" When appropriate I would explain mass in steps to them and try to explain a simple run down of what will happen in what order. Ideally, they would have learned that after the Lord's transfiguration, communion would be following, and then "freedom" for them would be imminent. Nope, they seem to ask after each reading, each song and sometimes after communion (Okay, not really that often, but it feels like it). Come on, folks....does anyone else smell a fox?

Well, I had enough of it, and finally came up with a plan. Because my kiddos are still learning to read, the "kid" mass manuals were useless for us. I thought about using a pictorial story. Over the span of about 6 masses, I took notes, revised, revised and revised my very own Picto-Mass-Schedule. If you compare it to your own mass, it should be pretty right on, except for our parish's own traditions. Here is a like to the pdf. Let me know if it does not work for you.
Now, the kids can color the action as it happens, mark it out, circle it, or whatever. Yes, they did ask a couple times "where we were," but that was easier for me to handle. They have only used it for 2 masses so far, so I can't tell you about its long term success, but so far so good. A fellow parishioner saw the kids coloring it and thought the idea was fabulous. Ummm, thanks. :-)
Have a great week!
~hurley

Tuesday, June 12, 2012

I like my hair, again!

I made a ridiculous call last month. I wanted my hair to be lighter, but not yellow. I grabbed the cutest hair color out of a box, and guess what color my hair turned! Yep....yellow. Internally, I have been very self conscious, even when some of my friends say that it is "getting better" with the continued hair washings. Today, I was done with it. I crossed my fingers that my hair gal Sandra could squeeze me in THIS MORNING! Thanks goodness it was early AND a Tuesday. THANKS Sandra!! I feel like me, again!

I posted this mainly to show my friends that I am back to normal. :-) Now, to think more about upcoming Father's Day! Have a great day.
~hurley

Saturday, June 9, 2012

Fun Flower Pen tutorial

I love simple crafts. This is a hit with my kiddos and was a gift for their teachers at the end of the year.
1. The supplies are floral tape, scissors, a fake flower and a pen of choice (I choose a pen that can "click" to close, but you can use any type).
2. I line up the flower next to the pen where the bloom hit above the clicker, and I cut the flower wire above the writing part of the pen. 
3. Starting at the top, I tape around the pen a couple of times.
4. I then slowly twirl it around the pen, angling downward.
5.  I like to match the flower color with the ink color (blue/blue), but to each her own. The pens below are maroon & red. 
My daughter and I LOVE these pens, and my son loves helping MAKE them, but not use them. I am trying to figure out a fun "boy" topper to a pen. Any ideas? Off to brainstorm.
Have a great day!
~hurley


Necklace Display (Jewelry)

I am on a crusade to find a better way to store and see all of my jewelry. I found a piece at my local thrift store with 12 short dowels on it and thought about my necklaces. I found a place in my bathroom that is covered by the door when it is open.

 I marked and hammered two nails to hold the "dowel piece" on the wall.
Here it is as level as possible on the wall at a nice height.
I hung up the necklaces from my original jewelry box. These are all the ones that are not in a matched set. I am a sucker for jewelry sets. Looking at these hanging up in "plain" sight for me to see them makes me want to wear more of them.
Overall, I love this new addition to our bathroom, but I do want to create something for my "sets." The tough thing I am dealing with is storing stud earrings. I don't really do too many dangling ones, which seem so easy to store looking at Pinterest.

Here's to simple ideas.
~hurley