Monday, November 14, 2016

I Was an AWESOME Mom Before I Had Kids

If you have kids, you know exactly what I mean. If you do not, then save this post and read it after you have some.  I fell in love with this video by the Lindquists "Being a Mom: Real Life!", and it got me to think about my OWN pre-kids' list of awesomeness.


Many see the light early on with babies, but there are still plenty of preconceived notions about kids. Here is my list of what I thought life would be like.

1. My kids will not eat McDonald's.
2. I will take my kids outdoors everyday.
3. My kids will brush their teeth daily.
4. Television will not be used, JUST so I can get work done.
5. My house will not look like a toy store.
6. I will never spank my kids.
7. I will read everyday to or with my kids.
8. I will make sure homework is completed on a Friday.
9. Using the "Mom Look" is all I will need for discipline.
10. I will not bribe my kids.

   NOW, that I have three kids of my own, I am so much more realistic, but I still don't know all of the future boundaries I might fudge. What about you?

Only 3 are mine. Yes, I was brave enough to take 5 to a museum, but not daily.

Monday, October 24, 2016

Sunglasses are important and cool.

Whether it is summer or winter, sunglasses are an important accessory for our eyes. In addition to protection from sun rays, they are also a great way to look cool. ;-)
     (Although, I must say that that wearing sunglasses INDOOR is not cool. lol)
Here is my shopping buddy. Yes, he looks cute trying on MY sunglasses, but these stay on much better.

Monday, March 7, 2016

My Rodan + Fields personal product use

I have been having a great time using products from Rodan + Fields. As a tomboy, I never thought I would say that. My skin feels and looks healthier than ever.
Overtime, I have used various R+F products and these are some of my own photos. I did the best I could to show real results.
My first results photos in 2013.
I was ready for my close up. 2013
One year apart and no make up in either photo.
We have SPF Mineral Peptides in 3 shades.
Can you tell which side of my face has the Light and Medium Shades?
Playing with our Foaming Sunless Tanner was the best.
No orange legs for this pale gal.
Zoomed in image of my crazy experiment.
And my experiment with both legs a month later.
(4 total pumps; 100 pumps per bottle)
Bye Bye, Blackheads.
We have great mini-regimens.
Our "Fill A Wrinkle While You Sleep" Acute Care Patches
have a 95% success rate expectation after just one night.
My "11" took years to develop, and I was surprised
it was filled in even a little.
Check out my pictorial tutorial for the Redefine Regimen, Multi-Function Eye Cream, SPF Mineral Peptides, Eye Cloths and the patented AMP MD System.  :-) 

Stay tuned for more results. I am enjoying Aging Backwards.

What regimen would work for you? Here is our Skincare Tool with a personal recommendation emailed to you when you enter your email address.

Friday, January 16, 2015

Wow, it is 2015...

Yes, time has gone by, and I am still here, but not really blogging much. On September 4, 2014 we welcomed Maximilian into our lives. Sure that is not the whole reason my last blog entry was in April 2013, but it was part of it. ;-) I do miss blogging creative ideas, and I look forward to doing it again this year....eventually.

On January 1, 2015 I started a "2015 Daily To Do's With hurley" Facebook page with daily 10 minute or less challenges to do. Some are crafty; some are organizational; some are completely random. It is something that motivates me without needing too much time. It has been fun sharing ideas with friends and getting small goals accomplished (mostly) everyday. Feel free to check it out here and possibly join. It is never too late, and nothing is mandatory!!

Here is my family now, and I look forward to sharing more ideas with you again.


Thank you to Erin Meehan Photography in the DC area! She is awesome!!!

~hurley

Wednesday, April 10, 2013

I Love the Love My Kids Share


So, I try to take simple pictures of the kids some days before school in the morning. I am taking a shot of Mya and in jumps Cole. They instantly put arms around each other and smile. It almost made me weep with joy! Overall, they get along very well and are well intentioned kids. This was a wonderful morning. I need to remember this morning on the days they are screaming at each other. lol


Any suggestions out there for activities to help continue the love?

Friday, March 29, 2013

I am loving my Rodan + Fields "hobby"

Rodan+Fields - My New Chapter
     I am marketing for Rodan + Fields and absolutely love the company & products. I am fortunate to be a part of a truly giving and supportive team of amazing men and women: Team GiVe.....Genuine.Inspired.Vibrant.Entrepreneurs.
The success of this company AND the products is obvious with triple-digit growth reported two years in a row. (~2016)  Finding a solution to your own skin condition (acne, sun damage/dark spots, sensitivities or signs of aging) is as easy as taking the two-minute, online quiz created by the same Doctors who created Proactiv. 

Curious about the Products?

Curious about the Business?

Our FREE Press:
Rodan + Fields
MAGAZINES
Various Mediums

Team GiVe
Today Show 2015 (recommended by Corporate)

RODAN + FIELDS IS NOW INTERNATIONAL
Canada (early 2015)
Australia (start of 2017)

Yes, this is me.
Here I am with more of MY OWN successes.

General Q&A:

Provide a brief description of your company and the products?


At Rodan + Fields® Dermatologists we are committed to connecting you with the products, the knowledge, the resources and the opportunities to change your skin and to change your life.
Dr. Katie Rodan and Dr. Kathy Fields, the creators of Proactiv® Solution, launched Rodan + Fields Dermatologists to extend their vision of bringing dermatology based skincare solutions to everyone. To support this vision, Dr. Rodan and Dr. Fields have teamed up with Independent Consultants like me around the country to market these prestigious products.
With Rodan + Fields, looking good and feeling confident has never been easier and it’s all possible without a trip to the dermatologist’s office. Our products are clinically proven to deliver on their promises and this has lead to a large and loyal customer base.
We’re so confident that you’ll experience real results that all of our products come with a 60-day Satisfaction Guarantee.
Discover the difference that great skincare can make in your life with Rodan + Fields.

Provide a brief company history including how long in business and how many consultants in how many countries.

Dr. Katie Rodan and Dr. Kathy Fields founded Rodan + Fields Dermatologists in 2002 to help people treat everyday skin concerns. Rodan + Fields quickly became a leading dermatologist brand in top-tier department stores. To broaden their reach and achieve their vision of bringing dermatologist-based skin treatments to everyone, Rodan + Fields became the first prestige skincare line to exit the department store and enter the direct selling market in 2008.
We are currently launched in about a dozen states only in the US to date. I estimate that there are less than 5,000 consultants nationwide.

What is the cost to start up? What comes in the startup kit?

There are 4 entry levels to become a consultant and business kits range from $45 to $995 and offer great value and free 2 day shipping. This page explains them all: hurleythurston.myrandf.biz/Pages/BusinessSystem/Kits

Are there any additional expenses (startup, yearly renewal, website, etc)?

Pulse, our proprietary business management suite, gives you state of the art resources to grow your business.
Pulse subscription includes:
• 2 personalized websites
• Rodan + Fields email account
• Exclusive Prospecting and Recruiting Programs
• State-of-the-art business management tools
• Training & Documentation… all for just $24.95/month*
*Your Pulse subscription generates 20 monthly SV.
Your annual renewal is waived if you maintain a product purchase or SV of $80/mo. + Pulse subscription = $100 SV/mo

How much is the commission on personal sales and downline? How often are consultants paid?

Retail sales = 25%, Preferred Customer sales = 15%, 10% on your Level 1 sales, 5% on your Personal Team Sales, and 5% on all Generation levels up to 5. There is a great income illustrator that gives you an idea of potential income at https://www.rodanandfields.com/IncomeIllustrator/index.html
Consultants are paid about the 15th of each month and direct deposit is available.

What are some of the additional benefits/rewards consultants can earn?

With the power of the Rodan + Fields brand, AMP MD and our Big Business Launch duplication training model, you can earn over $1000 and begin to create your pattern to prosperity in your first month!
Also, new Consultants can earn an iPad 2 in their first few months with the Rodan + Fields iStart Program.
All new Level V Executive Consultants are invited to join the Rodan + Fields Corporate Team for a weekend of training and fun at the Rodan + Fields Level V Arrival Trip to San Francisco and California wine country where we will roll out the red carpet for our new Level V ECs as they visit our corporate office and enjoy the beautiful Sonoma Valley.
Rodan + Fields is about high performance products and a brand with integrity. We want our Independent Consultant leaders to have the opportunity to enjoy these same values in the cars that they drive. So we introduced the Road to RFx, our exclusive Lexus car program.  That’s just a few to get you going!

What is your favorite thing about your company?

The products! I have never loved my skin the way that I do now and I love sharing the products and helping people get the skin they’ve always wanted! I have seen so many of my friends benefit from using the products and our Solution Tool on my website will recommend products for you. We even have a nurse at our disposal to help with customer concerns.

What is your favorite product?

REVERSE for sun-damaged skin. Being a soccer player most of my life and a lover of the outdoors, the effects of the sun over all this time is apparent. REVERSE turns back the clock and eliminates the sun-damage for a more youthful even-toned appearance. After that regimen, I will switch to the REDEFINE system.

Have a question? Want more information? Contact me!

hurley thurston, Independent Consultant,
Military Town, USA (Wherever the Air Force sends us)
gethealthyskin@yahoo.com
R+F Business Page

Tuesday, January 29, 2013

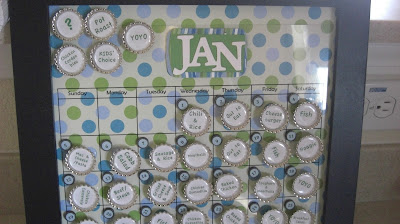
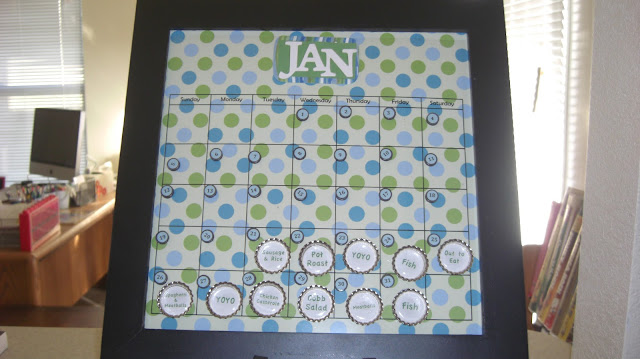
Magnetic Menu Planning Board

{mid-way through my menu board creation.}
   I am not a fan of cooking!!! You have to shop for groceries (certain ones at that), store them in your kitchen, remember that you have them, hem & haw about what to cook for dinner, pull out the correct  ingredients and follow a recipe to make that meal (correctly, if you can.) THEN you take 15-20 minutes, if you're lucky, to eat the meal. I love a lot of things, but spending more time preparing for a meal than eating said meal is not one of them.
   When I got married, I was not the main cook. I was spoiled. Ten years later, I am doing my best to increase my responsibility for the meals. I have already come a LONG way in the last two years. The worst part now is unintentionally (or is it?) waiting until 4pm to decide what to eat. Sometimes that is not a problem, but many times not defrosting the chicken, not having potatoes, or not noting that the meal needs 70 minutes in the oven (after prep time, mind you) really impedes my goal of having dinner ready by 5:45 pm.
   In comes my heroine!!! I love/stalk A Girl and Glue Gun and when she posted her menu board, I knew I had to scraplift it! Here I will show you how I made my own with my twist to it (aka using materials I already had). (PS: get ready for a lot of pictures!)

MATERIALS I used:
1. 33+ Epoxy dots (from Oriental Trading Ccompany)
2. 33+ Bottle caps (from OTC and my own growing collection)
3. 33+ Small circle magnets (from OTC)
4. Avery Circle Labels 5410 (and my printer)
5. Small circle punch
6. 12 Rectangle magnets (from OTC)
7. 12 x 12 frame with magnetic board (from OTC on sale)
8. 12 x 12 scrapbook paper for background
9. 12x12 clear, blank month calendar (from OTC)
10. Scrap paper for names of months
11. Small ziplock bag
12. Craft glue
13. Frame/Plate holder

(PS: Yes, I love oriental trading company, but it is more of a bulk thing sometimes and supplies are definitely available other places. Materials come and go from their inventory, as other stores. )

Because I do not see myself planning 28-31 days in advance (due to pm schedules, etc.), I decided to make 33 "meals" but only display two weeks at a time. Some of my meals are duplicated, so I can repeat within the 2 weeks. Extra can be hidden, so feel free to display 5 or 31.

DIRECTIONS:
1. Write a list of meal names. I use YOYO for Your On Your Own, Out to Eat, Kids' Choice and ? as some of our meals. Once you get 33 (or more) pull up your Word document using the insert labels and use Avery 5410 as your template. Type your meal names in whatever font & color you choose. The bigger the better. Print them out using paper size 4x6.

2. Get 33 (or however many you want to have) bottle caps. If your bottle caps are from actual bottles, I will post a tutorial soon about how to easily remove the rubber seal. This time I used some blank ones from Oriental Trading Company. (Did I tell you I love this website !?!)
3. Peel and stick the meal stickers into the bottle caps carefully. Also peel and stick the great 1 inch epoxy stickers on top of the meal names. This will protect the ink and the paper. Some people use the plastic "bubbles" with clear craft glue, but I was nervous about how heavy they might become.


4. Now you are ready to add your magnets. I used small circle ones, but use whatever you have on hand. I do suggest making sure they are strong enough to hold onto the magnetic board on the front and back even through the clear month sheet. I used magnets with a sticky side. Just peel and stick as close the the middle of the other side of the bottle cap as possible.
5. Insert your 12x12 scrapbook paper and the clear monthly calendar into the 12x12 frame. I forgot to take a picture of this step without the magnets on. I did want to triple ensure that my magnets would work.

6. Some people used dry erase markers to label the changing dates of the month, but I opted to use more of my tiny magnets. I printed numbers 1-31 in font sizes 10, 12, 14 and tested the sizes with my awesome tiny little circle punch. 

7. I had tested the size of the punch outs to my magnets, and it was as close as I could get to perfection (without pain-stakingly cutting out circles on my own... in comes the ease of dry erase numbers.) Again, because my magnets has the sticky side, I just stuck the date onto the magnet and done.
8. I went ahead and placed the dates in the upper left hand corner of the correct days of the week for January and put some meal caps in the lower right corner. They fit perfectly. Woo hoo!

9. You can print out the month names on your computer if you'd like. Fortunately, I had some chip art from OTC that had cute month abbreviations. I laid it on my calendar....... and did not love it.  :-(

10. I decided to layer the month names which definitely led to an easier way to put rectangle magnets on the back. I used craft glue to attach the chip art and then used fun scrap paper and a corner rounder.


11. I am not a huge fan of the extra meals being on the front. Too crowded for me. I propped up my menu board on a picture/plate holder and now had easy access to the BACK. :-) I put all the meals on the back. Fortunately with my magnetic board, both sides are magnetic. (You can also use metal flashing or thin sheets available at hardware stores.) If you have a frame with a backing and want to do this with your extra meals, just don't use the backing.
{Cock head to the left. Sorry.}

12. I needed a place for my extra month names. Originally I used a medium (technical , I know) sized ziplock and then changed to a snack size because they all fit and it looked more organized. I laid it on the legs of the plate holder on the back of the board. Waa laa; hidden.

13. I placed it on my kitchen counter where I could easily access it. I wanted to be able to turn it around for edits or changes easily. When my kiddos came home from school (okay, after I picked them up from school), they saw the completed menu board and went NUTS! Of course they gave each meal I chose the thumbs up or down, and then they saw it! KIDS' CHOICE. They asked if this meant they got to choose what mommy & daddy have to eat. I said yes, and their faces lit up. (Almost more than Christmas morning.) They already started making plans on what we would have to eat. First idea was mom=cereal and dad=mac n cheese. Phewww, not tooo bad. They did not even mind that it would only be ONCE a month.

I hope this inspired some of you, but if not I hope you enjoyed my process. I have to say that we have followed the past week perfectly, and the stress level around here is definitely lower. Happy Day!

~hurley