Thursday, June 28, 2012

Party Ideas: Pin It Game (ballerina)

Yes, we take the Pin the Tail on the Donkey classic and turn it into Pin the Tutu on the Ballerina.
The set up:
I use Google to find a simple outline of a ballerina tutu outfit. I trace the outline on the back of some pink floral & pearls scrapbook paper. I then use two sided tape to stick the folded tissue paper on the outfit for the tutu. (I thought I took pictures, sorry.)
I use up all my pink construction paper, so I have to use light blue. :-( Sniff, sniff; I move onward and draw a ballerina, tree, flowers, etc. I trace the tutu image to start the drawing of the ballerina. (I am not an artist!... duh.)
Then I see her with a tutu. Pretty good.

The Game:
The birthday girl gets to go first.
 Spin her to the left; spin her to the right.
One arm behind the back rule.
Oooops, but I look cute, anyway.
End of game.

The 3 winners choose from the prize bucket.

I love me some cheesy party games. I am already looking forward to my son's birthday. Lego games anyone???
~hurley


Wednesday, June 27, 2012

Party Ideas: Water Bottle Decoration & Goodie Box

More party fun from this past weekend:
Water Bottle Decorations:
Although we serve pink lemonade at my daughter's party, I also want to provide a monogrammed bottle of water, so the girls can keep from mixing them up and refill them with more water or lemonade if they wish.
1. I use one inch strips of paper that fit around the mini water bottles. I also need tape, two shape punches, left over scrapbook paper and adhesive foam dots/squares.
2. When put all together, it looks like this. Cute, huh?

Goodie Bag "twist"
I want the girls to be able to store their prizes and goodies from throughout the party, and I find these awesome multi-functional PINK locker boxes at The Dollar Tree. I.love.that.place!
1. I use the locker box, tape, three shape punches, left over scrapbook paper, and a simple sharpie marker.


2. The finished box is this.

3. Ingredients to start include a pink & green pencil and a pink pail. Throughout the party they add a personalized ice pop holder, a pink, homemade bean bag, a personalized treasure hunt bag, a necklace treasure they made, and a lip moisturizer.

More party reveals soon... it was so much fun.
~hurley

Tuesday, June 26, 2012

Party Ideas: Treasure Hunt Bags & Clues

{REMINDER: If you receive my Blog via email, and you want to visit the blog again to look around, you can click on the name of the post as a link.}
We love treasure hunts at our parties!!! This year I made pink treasure hunt bags and the picture clues. Someday they will be more fun with word clues.
Treasure Bags:
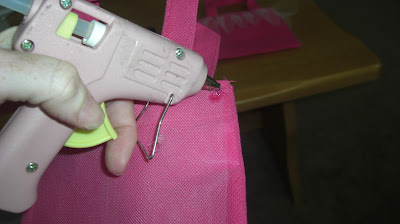
1. The bags have to be PINK. I use my handy glue gun to add some pink toile and overlap it, so it can look ruffled.

2. The glue spots under each ruffle show, but they will soon be covered.

 3. I measure ribbon that can go around and overlap a bit. I start in the middle and glue on edges and then where they overlap. No more glue spots showing.

4. Next I choose 2 pink fabrics to add to the bags for the monogram. I iron Heat n Bond following the package directions.

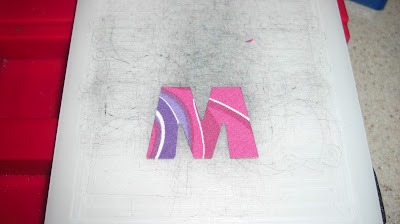
5. Then taking a break from my awesome Cricut, I save some time by using my trusty old Sizzix machine!! It is very important to make sure the fabric touches the die cut, so the letter image is correct.

6. A few strong pumps of the arm, and presto, an iron on letter for our treasure bag in half the time (or less).
or

7. While your iron heats up, make sure to peel off the paper backings of the Heat n Bond, so it will actually apply. Yes, I tried many times to apply WITHOUT removing the paper and it does not work!


8. A MORE important reminder is that when you are ready to iron the letter onto your "flimsy fabric" Dollar Tree Store bag (still.love.it), use a cotton layer between the iron and the letter.

9. Yes, you know that I remove some pink fabric from my iron the first time! Poor iron & poor bag...

10. Here is the final product when ironed correctly. The girls love it.

11. Here it is getting filled with treasure.

Picture Clues:
Here are some pictures I take ahead of time and place in the correct order outside around our house.


The girls use a photo clue to find the next one.

My favorite picture of the party!!  (Thank you, Laura) 


At the end they find a treasure box of do it yourself homemade necklaces and pink freezer pops with monogrammed ice pop holders.

Yumm!
I have a blast planning, and they have a blast playing. The Hunt was a real hit.
Until the next party post, have a good one!
~hurley

Monday, June 25, 2012

Party Ideas: Fun Pink Frame "Studio"

The party this weekend was a blast, if I may say so myself. Here is another project I did for my little girl's birthday. I saw something on Pinterest, found this frame at my local thrift store, and this is what I did.
                                               
Other materials include a flat cardboard box, light pink spray paint and a few paper towels.

This cardboard box saves my grass from turning pink. I coat three times to ensure it is dark enough. The molding has a darker tone, and I like it that way. I use the paper towel to remove a LITTLE paint from the molding.

To make sure it gets super dry, I lean it against our porch in our ol' Texas sun. I love this light pink.

Here is our large sized model, Gymbo the clown from Gymboree. This shot is a vertical shot where cropping can occur at the top and bottom. I don't want the feet or clothing rack to show. I want to crop around the frame only.

Here is the vertical shot. This is easy to crop on the left and the right. I take both angles to see which come out easier.

I use a zip tie to attach the wire hanger on the frame to the top of the clothing rack.

This particular clothing rack has two levels, and I remove the top section, so it is not visible. Ideally, I would have preferred no wheels, but you gotta use what you gotta use.

I add a simple pink sheet for the background on the wall, insert a chair for the gals to sit, and have a dress up box of PINK stuff for the girls to use if they wish. When my dear hubby takes the photos, he uses the frame as three borders, so I only had to crop the top out. We ended up putting a plastic storage box under the "frame" so the girls could stand instead of sit. (no pic of that, sorry)
Here are a couple of real party shots. I want to use these as part of a simple Thank You note since we had Goodie Boxes, too. I just love the photo sentiment.
Mya is my little 5 year old princess!!


~hurley